Office Ergonomics - Stretching - At the Workstation
On this page
Why is stretching important?
Back to topNo matter how well a workstation is designed, issues may arise if attention is not paid to the way the work is done. Working at a computer often involves very few changes in body position. This lack of movement can lead to muscle pain and strain.
What can be done to minimize this strain?
Back to topIt is recommended that a person break for 5-10 minutes for every hour spent at a workstation. If possible, it is ideal to stand up and walk for this time (e.g., work tasks that involve standing, walking, or at minimum, a change of body position). Some of these stretches can be done at the same time.
- Vary the work tasks. Break up keyboarding tasks work by doing other job duties or tasks that involve moving around or changing body position. Try to stand up and move around.
- Look away from the screen occasionally and focus your eyes on an object far away.
- Take regular rest breaks to ease muscle aches, eye strain and stress.
- Relax your muscles, stretch and change position.
- Hold the stretch for a reasonable time (e.g., 10-20 seconds).
- Breathe normally.
- Do not bounce, pull/push excessively, or lock your joints. You should feel a stretch, but not pain.
- If you feel pain or severe discomfort, stop stretching. Ask your medical professional for advice.
What are some stretches for the hands and forearms that can be done at the workstation?
Back to top1. a) Start with your hand open.

b) Make a fist. Keep your thumb straight, not tucked under your fingers.

c) Slide your fingertips up your palm so the tips of your fingers are near the base of your fingers, and you should feel a stretch. Do not force your fingers with your other hand if something is painful.


2. With your hand open and facing down, gently bend the wrist from side to side as far as possible. Hold for 3 to 5 seconds. Repeat 3 times.
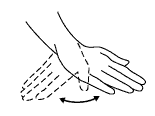
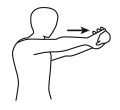
3. Start by stretching your arm and hand out and slowly rotate the wrist down until you feel a stretch. Hold for 3 to 5 seconds. Next, rotate the palm up until you feel a stretch. Repeat 3 times.
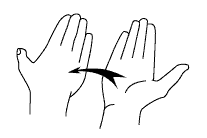
4. Grasp your hand and hold your fingers with the other hand. Slowly bend your wrist down until you feel a stretch. Hold for 3 to 5 seconds. Relax. Repeat 3 times. Then slowly bend your wrist up until you feel the stretch. Hold and relax as above.
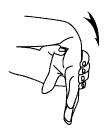
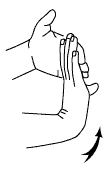
5. Sitting with your elbows on the table and palms together, slowly lower wrists to the table until you feel a stretch (your elbows will move outward a bit). Be sure to keep your palms together throughout the stretch. Hold 5 to 7 seconds. Relax. Repeat 3 times.

What are some stretches for the neck and shoulders?
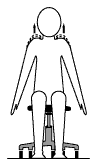
Back to top1. Shoulder Shrug: The purpose of the shoulder shrug is to relieve early symptoms of tightness or tension in the shoulder and neck area.
- Raise the tops of your shoulders towards your ears until you feel slight tension in your neck and shoulders. Hold this feeling of tension for 3 to 5 seconds. Then relax your shoulders downward into their normal position. Do this 2 or 3 times.
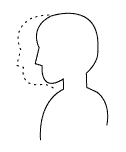
2. Head Glide: The head glide helps to stretch your chest, neck and shoulder muscles.
- Sit or stand upright. Without lifting your chin, glide your head straight back. You are doing the exercise right if it gives you the feeling of a double chin. Hold for 20 counts and repeat 5 to 10 times.
3. Neck Relaxer: This exercise helps to relax the neck.
- Drop your head slowly to the left, trying to touch your left ear to your left shoulder. Repeat on the right side. Slowly drop your chin to your chest, turn your head all the way to the left, then turn all the way to the right.
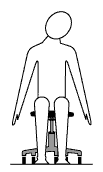
4. Shoulder Roll: This exercise will help relax the shoulder muscles.
- Slowly roll your shoulders backward five times in a circular motion. Next, roll your shoulders forward.
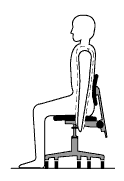
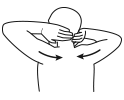
5. Chest stretch:
- Place your hands behind your head, and squeeze your shoulder blades together.
What are some stretches for the back, side and legs?
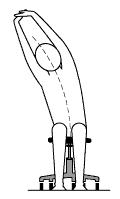
Back to top1. Back / Side Stretch:
- Interlace your fingers and lift your arms over your head, keeping the elbows straight. Press your arms as far back as you can. To stretch your sides, slowly lean to the left and then to the right. In a similar way, you can also bring your arms in front of your body, or behind to stretch the shoulder blades and chest.
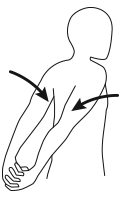
2. Middle / Upper Back Stretch:
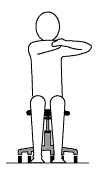
- Hold your right arm with your left hand just above the elbow. Gently push your elbow toward your left shoulder. Hold the stretch for 5 seconds. Repeat with your left arm.
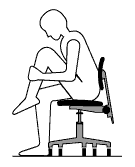
3. Back Curl (will also stretch your legs):
- Grasp your shin. Lift the leg off the floor. Bend forward (curling your back), and reach your nose to your knee. Repeat with the other leg.
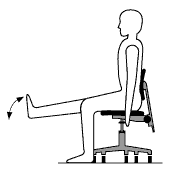
4. Ankle Flex and Stretch:
- Hold one foot off the floor with your leg straight. Alternately flex your ankle (point your toes up) and extend (point your toes down). Repeat with the other leg.
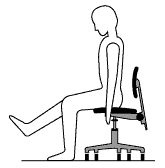
5. Leg Lift:
- Sit forward on the chair so that your back is not touching the chair's back. Place feet flat on the floor. With a straight leg, lift one foot a few inches off the floor. Hold momentarily, and return your foot to the floor. Repeat with the other leg.
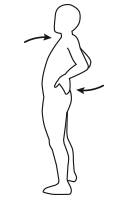
6. Standing stretch:
- When standing, keep your knees slightly bent. Place your hands on your lower back and gently push your hands forward while leaning back slightly.
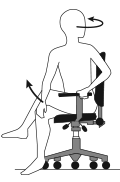
7. Hip stretch:
- Sit with one leg across the other. Place your arm or elbow on the outside of the crossed leg. Gently apply pressure, while looking the opposite way. Repeat with the other leg.
Adapted from: Office Ergonomics Safety Guide, by CCOHS.
- Fact sheet confirmed current: 2025-02-04
- Fact sheet last revised: 2014-04-03

